SpringCloud学习笔记_feign/hystrix/fallbackfactory.class-程序员宅基地
技术标签: springcloud
SpringCloud
微服务概述
什么是微服务
- 目前的微服务并没有一个统一的标准,一般是以业务来划分
- 将传统的一站式应用,拆分成一个个的服务,彻底去耦合,一个微服务就是单功能业务,只做一件事。
- 与微服务相对的叫巨石
微服务与微服务架构
- 微服务是一种架构模式或者一种架构风格,提倡将单一应用程序划分成一组小的服务独立部署,服务之间相互配合、相互协调,每个服务运行于自己的进程中。
- 服务与服务间采用轻量级通讯,如HTTP的RESTful API等
- 避免统一的、集中式的服务管理机制
微服务的优缺点
优点
- 每个服务足够内聚,足够小,比较容易聚焦
- 开发简单且效率高,一个服务只做一件事情
- 开发团队小,一般2-5人足以(当然按实际为准)
- 微服务是松耦合的,无论开发还是部署都可以独立完成
- 微服务能用不同的语言开发
- 易于和第三方集成,微服务允许容易且灵活的自动集成部署(持续集成工具有Jenkins,Hudson,bamboo等)
- 微服务易于被开发人员理解,修改和维护,这样可以使小团队更加关注自己的工作成果,而无需一定要通过合作才能体现价值
- 微服务允许你融合最新的技术
- 微服务只是业务逻辑的代码,不会和HTML,CSS或其他界面组件融合。
- 每个微服务都可以有自己的存储能力,数据库可自有也可以统一,十分灵活。
缺点
- 开发人员要处理分布式系统的复杂性
- 多服务运维难度,随着服务的增加,运维的压力也会增大
- 依赖系统部署
- 服务间通讯的成本
- 数据的一致性
- 系统集成测试
- 性能监控的难度
微服务的技术栈
| 微服务条目 | 落地技术 |
|---|---|
| 服务开发 | SpringBoot,Spring,SpringMVC |
| 服务配置与管理 | Netflix公司的Archaius、阿里的Diamond等 |
| 服务注册与发现 | Eureka、Consul、Zookeeper等 |
| 服务调用 | Rest、RPC、gRPC |
| 服务熔断器 | Hystrix、Envoy等 |
| 负载均衡 | Ribbon、Nginx等 |
| 服务接口调用(客户端调用服务的简化工具) | Feign等 |
| 消息队列 | Kafka、RabbitMQ、ActiveMQ等 |
| 服务配置中心管理 | SpringCloudConfig、Chef等 |
| 服务路由(API网关) | Zuul等 |
| 服务监控 | Zabbix、Nagios、Metrics、Specatator等 |
| 全链路追踪 | Zipkin、Brave、Dapper等 |
| 服务部署 | Docker、OpenStack、Kubernetes等 |
| 数据流操作开发包 | SpringCloud Stream(封装与Redis,Rabbit,Kafka等发送接收消息) |
| 事件消息总线 | SpringCloud Bus |
为什么选SpringCloud作为微服务架构
选型依据
- 整体解决方案和框架的成熟度
- 社区热度
- 可维护性
- 学习曲线
当前各大IT公司的微服务架构
- 阿里Dubbo/HSF
- 京东JSF
- 新浪Motan
- 当当DubboX
各微服务的框架对比
| 功能点/服务框架 | Netflix/SpringCloud | Motan | gRPC | Thrift | Dubbo/DubboX |
|---|---|---|---|---|---|
| 功能定位 | 完整的微服务架构 | RPC框架,但整合了ZK或Consul,实现集群环境的基本服务注册/发现 | RPC框架 | RPC框架 | 服务框架 |
| 支持Rest | 是,Ribbon支持多种可插拔的序列化选择 | 否 | 否 | 否 | 否 |
| 支持RPC | 否 | 是 | 是 | 是 | 是 |
| 支持多语言 | 是(Rest形式) | 否 | 是 | 是 | 否 |
| 服务注册/发现 | 是(Eureka) Eureka服务注册表,Karyon服务端框架支持服务自注册和健康检查 | 是(zookeeper/consul) | 否 | 否 | 是 |
| 负载均衡 | 是(服务端zuul+客户端Ribbon) zuul-服务,动态路由 云端负载均衡 Eureka(针对中间层服务器) | 是(客户端) | 否 | 否 | 是(客户端) |
| 配置服务 | Netflix Archaius SpringCloud Config Server集中配置 | 是(zookeeper提供) | 否 | 否 | 否 |
| 服务调用链监控 | 是(zuul) Zuul提供边缘服务,API网关 | 否 | 否 | 否 | 否 |
| 高可用/容错 | 是(服务端Hystrix+客户端Ribbon) | 是(客户端) | 否 | 否 | 是(客户端) |
| 典型应用案例 | Netflix | Sina | |||
| 社区活跃度 | 高 | 一般 | 高 | 一般 | 2017年7月才重启 |
| 学习难度 | 中等 | 一般 | 高 | 一般 | 低 |
| 文档丰富度 | 高 | 一般 | 一般 | 一般 | 高 |
| 其他 | Spring Cloud Bus为我们应用程序带来了更多管理端点 | 支持降级 | Netflix内部在开发集成gRPC | IDL定义 | 实践公司比较多 |
SpringCloud入门概述
- Spring的三大模块:SpringBoot(构建),Spring Cloud(协调),Spring Cloud Data Flow(连接)
SpringCloud是什么
- 分布式系统的简化版(官方介绍)
- SpringCloud基于SpringBoot提供了一整套微服务的解决方案,包括服务注册与发现,配置中心,全链路监控,服务网关,负载均衡,熔断器等组件,除了基于Netflix的开源组件做高度抽象封装之外,还有一些选型中立的开源组件
- SpringCloud利用SpringBoot的开发便利性巧妙地简化了分布式系统的基础设施开发,SpringCloud为开发人员提供了快速构建分布式系统的一些工具,包括配置管理、服务发现、断路器、路由、微代理、事件总线,全局所、决策精选、分布式会话等等,他们都可以用SpringBoot的开发风格做到一键启动和部署。
- 一句话概括:SpringCloud是分布式微服务架构下的一站式解决方案,是各个微服务架构落地技术的几何体,俗称微服务全家桶
SpringCloud和SpringBoot的关系
SpringBoot:专注于快速方便的开发单个个体微服务(关注微观)
SpringCloud:关注全局的微服务协调治理框架,将SpringBoot开发的一个个单体微服务组合并管理起来(关注宏观)
- SpringBoot可以离开SpringCloud独立使用,但是SpringCloud不可以离开SpringBoot,属于依赖关系
Dubbo是怎么到SpringCloud的?哪些优缺点去技术选型
目前成熟都互联网架构(分布式+服务治理Dubbo)
对比
| Dubbo | Spring | |
|---|---|---|
| 服务注册中心 | Zookeeper | Spring Cloud Netfilx Eureka |
| 服务调用方式 | RPC | REST API |
| 服务监控 | Dubbo-monitor | Spring Boot Admin |
| 断路器 | 不完善 | Spring Cloud Netflix Hystrix |
| 服务网关 | 无 | Spring Cloud Netflix Zuul |
| 分布式配置 | 无 | Spring Cloud Config |
| 服务跟踪 | 无 | Spring Cloud Sleuth |
| 消息总线 | 无 | Spring Cloud Bus |
| 数据流 | 无 | Spring Cloud Stream |
| 批量任务 | 无 | Spring Cloud Task |
最大区别:
- Spring Cloud抛弃了RPC通讯,采用基于HTTP的REST方式。Spring Cloud牺牲了服务调用的性能,但是同时也避免了原生RPC带来的问题。REST比RPC更为灵活,不存在代码级别的强依赖,在强调快速演化的微服务环境下,显然更合适。
- 一句话:Dubbo像组装机,Spring Cloud像一体机
- 社区的支持与力度:Dubbo曾经停运了5年,虽然重启了,但是对于技术发展的新需求,还是需要开发者自行去拓展,对于中小型公司,显然显得比较费时费力,也不一定有强大的实力去修改源码
####总结
- 解决的问题域不一样:Dubbo的定位是一款RPC框架,Spring Cloud的目标是微服务架构下的一站式解决方案
SpringCloud的参考资料
构建SpringCloud工程
概述:SpringCloud工程由一个父工程和若干个Module组成
应该遵循的条件:约定 > 配置 > 编码
RestTemplate类
介绍
RestTemplate是Spring提供的用于访问Rest服务的客户端模板工具集,提供了多种远程访问Http的方法
意义
在一些不涉及实现方法的模块中(消费者),只需要调用其他服务暴露出的接口即可满足的需求,使用RestTemplate类中的方法可以发出需要的HTTP请求并得到返回结果。(类似Ajax)
RestTemplate用法
RestTemplate restTemplate = new RestTemplate();
//url:请求地址
//requestMap:请求参数
//type.class:HTTP响应转换成的对象类型
restTemplate.getForObject(url,type.class);
restTemplate.postForObject(url,requestMap,type.class);
构建父工程
- 创建一个Maven父工程并命名GAV
- 打包方式为POM
- 在pom.xml中定义各依赖的版本号(若Module中pom.xml的依赖没有指定版本号,则会根据父工程的版本号加入依赖)
- 加入通用的依赖和插件
构建Module
- 在父工程下新建Maven的Module,打包方式为jar
- 一般来时GAV中 GV随父工程,自己定义A即可
- 在该Module下pom.xml中加入其它需要的依赖
- 正常开发即可
- 完成后先clean一下Maven项目,然后再install提供给其它模块调用
添加其它Module的依赖方法
- 直接引用其GAV即可
    <dependencies>
        <dependency>
            <groupId>com.lzl</groupId>
            <artifactId>microservice-api</artifactId>
            <version>${project.version}</version>
        </dependency>
    </dependencies>
配置该module下的yml
- 微服务需要独立的端口
- 微服务最重要的是取名字!!!!一定要给微服务配置一个名字!这个名字就是这个微服务对外暴露的名字!
- 配置该模块下的其它相关配置(如本例配置了mybatis)
server:
  port: 8001

mybatis:
  config-location: classpath:mybatis/mybatis.cfg.xml
  type-aliases-package: com.XXX.entity
  mapper-locations:
  - classpath:mybatis/mapper/**/*.xml
spring:
  application:
    name: microservicecloud-dept   #为这个服务取名,非常重要!!!!!
  datasource:
    type: com.alibaba.druid.pool.DruidDataSource
    driver-class-name: org.gjt.mm.mysql.Driver
    url: jdbc:mysql://localhost:3306/cloudDB01
    username: root
    password: 123456
    dbcp2:
      min-idle: 5         #最小连接数
      initial-size: 5    #初始化连接数
      max-total: 10      #最大连接数
      max-wait-millis: 200    #等待连接最长的超时时间
编写主启动类
- 记得主启动类放在根包下,com.xxx.xxx
package com.XXX;

import org.springframework.boot.SpringApplication;
import org.springframework.boot.autoconfigure.SpringBootApplication;

@SpringBootApplication
public class Provider8001_APP {

    public static void main(String[] args) {

        SpringApplication.run(Provider8001_APP.class,args);
    }
}
SpringCloud添加组件的基本套路
- 新增这个组件的maven坐标GAV
- 在启动类上面标注启动该组件(一般来说是@EnableXXXXX)
- 编写业务逻辑代码
Eureka服务注册与发现
Eureka介绍及原理
理解
Eureka就像一个物业管理公司,其他微服务就像小区的住户,每个住户入住时都要向物业管理公司注册,并定时向物业公司交管理费
介绍
- Eureka是一个基于REST的服务,用于定位服务,以实现云端中间层服务发现和故障转移。
- Eureka主管服务注册与发现,在微服务中,以后了这两者,只需要使用服务的标识符(就是那个在每个服务的yml文件中取得服务名称),就可以访问到服务,不需要修改服务调用的配置文件
- Eureka遵循AP原则(高可用,分区容错性),因为使用了自我保护机制所以保证了高可用
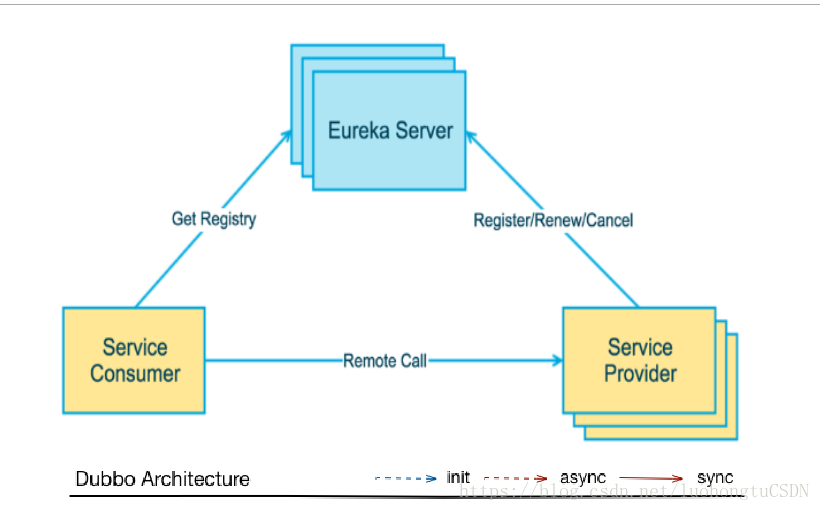
原理
- Eureka使用的是C-S结构(客户端-服务端)
- 两大组件:Eureka Server(提供注册服务)、 Eureka Client(JAVA客户端,负责发送心跳)
- 系统中的其他微服务使用Eureka客户端连接到Eureka服务端维持心跳连接(即注册)。SpringCloud的其他模块可以通过Eureka Server 来发现系统中的微服务并加以调用
Eureka服务注册中心构建
加入服务端依赖
<dependency>
            <groupId>org.springframework.cloud</groupId>
            <artifactId>spring-cloud-starter-eureka-server</artifactId>
        </dependency>
配置yml
- 理解:物业公司肯定不向自己注册自己,并肯定知道自己在哪,不用参加检索
server:
  port: 7001
eureka:
  instance:
    hostname: localhost
  client:
    register-with-eureka: false     #false表示不向注册中心注册自己
    fetch-registry: false           #false表示自己就是注册中心,职责是维护实例,不参加检索
    service-url:
      defaultZone: http://${
    eureka.instance.hostname}:${
    server.port}/eureka/    #设置eureka server的交互地址,即对外暴露的地址
添加启动类
- 注意:要在类前加@EnableEurekaServer标注
package com.XXX;

import org.springframework.boot.SpringApplication;
import org.springframework.boot.autoconfigure.SpringBootApplication;
import org.springframework.cloud.netflix.eureka.server.EnableEurekaServer;

@SpringBootApplication
@EnableEurekaServer
public class Eureka7001_APP {

    public static void main(String[] args) {

        SpringApplication.run(Eureka7001_APP.class,args);
    }
}
验证是否构建成功
启动主程序,访问该服务地址即可
向Eureka注册中心注册微服务
增加依赖
在要注册的微服务的pom.xml文件中增加依赖
		<dependency>
            <groupId>org.springframework.cloud</groupId>
            <artifactId>spring-cloud-starter-eureka</artifactId>
        </dependency>
        <dependency>
            <groupId>org.springframework.cloud</groupId>
            <artifactId>spring-cloud-starter-config</artifactId>
        </dependency>
修改yml
- 在application.yml中增加以内容,将客户端注册到服务列表内
- 理解:小区用户要找到物业管理处的地址进行注册
eureka:
  client:
    service-url:
      defaultZone: http://localhost:7001/eureka
server:
  port: 17001

spring:
  application:
    name: eurekaClient  # 修改服务名
主启动类增加注解
- 增加@EnableEurekaClient注解
@SpringBootApplication
@EnableEurekaClient
public class Provider8001_APP {

    public static void main(String[] args) {

        SpringApplication.run(Provider8001_APP.class,args);
    }
}
actuator与微服务注册完善
主机名称与服务名称的修改
- 修改服务名称,在yml中eureka节点下添加如下内容
 eureka:
  instance:
    instance-id: dept8001		#修改别名
    prefer-ip-address: true		#显示IP地址
info内容的详细信息修改
作用
在查看Eureka时点击进入某个微服务的info时,能给查看者一些必要的信息,可以帮助查看者快速的了解该微服务,开发中十分有意义。
修改方法
- 当前工程添加依赖
        <dependency>
            <groupId>org.springframework.boot</groupId>
            <artifactId>spring-boot-starter-actuator</artifactId>
        </dependency>
- 总的父工程的build节点下添加如下内容
<build>
        <finalName>microservicecloud</finalName>
        <resources>
            <resource>
             	<!--允许扫描该路径下的资源文件-->
                <directory>src/main/resources</directory>
                <filtering>true</filtering>
            </resource>
        </resources>
        <plugins>
            <plugin>
                <groupId>org.apache.maven.plugins</groupId>
                <artifactId>maven-resources-plugin</artifactId>
                <configuration>
                    <delimiters>
                     	<!--指定动态获取以$标志开头结尾的信息-->
                        <delimit>$</delimit>
                    </delimiters>
                </configuration>
            </plugin>
        </plugins>
    </build>
- 在当前工程 的application.yml文件添加回显信息
info:
  author: XXX
  build-version: $project.version$
Eureka的自我保护
介绍
Eureka的自我保护机制主要是为了网络异常时保持高可用设计的,当在Eureka中注册的微服务超过设定是时间内(默认90秒)没有向Eureka服务端发送心跳,该微服务会进入自我保护模式。在自我保护模式中,Eureka会保护服务注册表中的信息,不会注销任何服务实例,直至收到的心跳数恢复至阈值以上,该微服务退出自我保护模式。
理解
好死不如赖活:Eureka的设计哲学是宁可保留错误的服务信息,也不盲目注销可能健康的服务。所以异常的服务不会被注销,而是进入了自我保护模式。
自我保护模式的开关
在Eureka Server模块下的yml文件中添加配置信息即可,true表示打开自我保护模式;false表示关闭自我保护模式(不推荐)
  server:
    enable-self-preservation: false
Eureka的服务发现
介绍
系统中的微服务可以通过Eureka的服务发现去获得在Eureka中注册的服务的信息,这是一个对外暴露的接口。
使用方法(provider中)
- 注入DiscoveryClient 对象(spring包下的),在controller方法中获取
@Autowired
private DiscoveryClient discoveryClient;

@ResponseBody
@GetMapping("/provider/discovery")
public Object discovery(){

        List<String> list = discoveryClient.getServices();
        System.out.println(list);
        List<ServiceInstance> insList = discoveryClient.getInstances("MICROSERVICECLOUD-DEPT");
        for (ServiceInstance si:insList) {

            System.out.println(si.getHost() +"," + si.getServiceId() +"," +si.getPort() +"," +si.getUri() +"," +si.getMetadata());
        }
        return this.discoveryClient;
    }
- 在主启动类中加入@EnableDiscoveryClient注解
@SpringBootApplication
@EnableEurekaClient
@EnableDiscoveryClient
public class Provider8001_APP {

    public static void main(String[] args) {

        SpringApplication.run(Provider8001_APP.class,args);
    }
}
使用方法(consumer中)
在controller方法中使用restTemplate对象调用provider中暴露的URL 并获得返回对象即可
@GetMapping("/discovery")
public Object discovery() {

        return restTemplate.getForObject(URL_PREFIX+"/provider/discovery",Object.class);
    }
Eureka的集群配置
集群
集群就是在不同的机器上配置相同的服务来构建要一个大的运算整体
实现集群
- 新建N个Eureka Server模块
- 每个模块的pom.xml中加入与单个Eureka Server相同的依赖
- 每个模块加入主程序(记得加@EnableEurekaServer注解)
- 修改hosts文件(Win7的路径是C:\Windows\System32\drivers\etc)
127.0.0.1 eureka7001.com
127.0.0.1 eureka7002.com
127.0.0.1 eureka7003.com
- 修改Eureka Server模块的application.yml文件,加入集群,主要修改两个地方:
- hostname:修改为hosts文件中映射的地址
- service-url下的defaultZone节点:填入集群中另外的server服务端的地址
server:
  port: 7001
eureka:
  instance:
    hostname: eureka7001.com    #hostname为hosts文件中映射的地址
  client:
    register-with-eureka: false     #false表示不向注册中心注册自己
    fetch-registry: false           #false表示自己就是注册中心,职责是维护实例,不参加检索
    service-url:
      #defaultZone: http://${eureka.instance.hostname}:${server.port}/eureka/    #设置eureka server的交互地址
      defaultZone: http://eureka7002.com:7002/eureka/,http://eureka7003.com:7003/eureka/  #其他两个服务端的地址
- 修改Eureka Client模块的application.yml文件,使其向集群注册服务
- service-url下的defaultZone节点:填入集群中需要向其注册server服务端的地址
eureka:
  client:
    service-url:
      defaultZone: http://eureka7001.com:7001/eureka,http://eureka7002.com:7002/eureka,http://eureka7003.com:7003/eureka
- 访问地址
http://eureka7001.com:7001
http://eureka7002.com:7002
http://eureka7003.com:7003
- 注:defaultZone中eureka/后缀是必须的,如果删除,Server类不会报错,但是Client注册时会报404错误
Eureka与Zookeeper对比
CAP设计原则不同
Eureka遵守AP,Zookeeper遵守CP(C:强一致性,A:高可用,P:分区容错性,三者只能选其二,高并发下P必选)
网络波动下两者的处理对比
| Zookeeper | Eureka |
|---|---|
| 当网络出现故障时,剩余zk集群会发起投票选举新的leader,但是此过程会持续30~120s,此过程对于高并发来说十分漫长,会导致整个注册服务的瘫痪,这是不可容忍的 | 在15分钟内85%的节点都没有心跳,则注册中心 会认为客户端与之出现了网络故障,则会进入自动保护模式。1.Eureka不会移除没有收到心跳的服务;2.新的服务仍能在服务端注册,但是暂时不会被同步到其他节点上直到网络稳定 |
结论
Eureka可以很好的应对网络故障导致部分节点失去连接的情况,而不会像zookeeper那样导致整个注册服务系统的瘫痪。
Ribbon负载均衡
Spring Cloud Ribbon是基于Netflix Ribbon实现的一套客户端负载均衡工具。Ribbon会自动帮助你基于某种规则(简单轮询、随机连接等),也可以实现自定义的负载均衡算法。
负载均衡
-
英文名称:Load Balance,微服务或分布式集群中常用的一种应用
-
简单来说负载均衡就是将用户的请求ping平摊的分配到多个任务上,从而是系统达到HA(高可用)
-
两种负载均衡:
- 集中式LB:偏硬件,服务的消费方和提供方之间使用独立的LB设施,由该设施负责把访问请求以某种策略转发至服务的提供方。
- 进程内LB:骗软件, 将LB逻辑集成到消费方,消费方从服务注册中心指导哪些地址可用,再自己选择一个合适的服务器。
Ribbon初步配置
- **Ribbon是客户端负载均衡工具!!!Ribbon是客户端负载均衡工具!!!Ribbon是客户端负载均衡工具!!!**所以应该配置在客户端
- 加入依赖,因为Riboon需要依赖Eureka运行,所以要同时加入Eureka依赖
        <dependency>
            <groupId>org.springframework.cloud</groupId>
            <artifactId>spring-cloud-starter-eureka</artifactId>
        </dependency>
        <dependency>
            <groupId>org.springframework.cloud</groupId>
            <artifactId>spring-cloud-starter-ribbon</artifactId>
        </dependency>
        <dependency>
            <groupId>org.springframework.cloud</groupId>
            <artifactId>spring-cloud-starter-config</artifactId>
- 对实现类加入@LoadBalanced注解
@Bean
@LoadBalanced
public RestTemplate getRestTemplate() {

        return  new RestTemplate();
    }
}
- 在application.yml文件中配置向注册中心注册,如果是作为消费者模块不提供服务,不应该注册自己
eureka:
  client:
    service-url:
      defaultZone: http://eureka7001.com:7001/eureka/,http://eureka7002.com:7002/eureka/,http://eureka7003.com:7003/eureka/
    register-with-eureka: false				#作为消费者不提供服务,不应该注册自己
- 主启动类中加入@EnableEurekaClient注解
@SpringBootApplication
@EnableEurekaClient
public class Consumer80_APP {

    public static void main(String[] args) {

        SpringApplication.run(Consumer80_APP.class,args);
    }
}
- 以上步骤1~4完成后即可在controller中直接通过服务名访问系统中的微服务,服务名作为URI
private static final String URL_PREFIX = "http://MICROSERVICECLOUD-DEPT/";
Ribbon负载均衡实现
架构示意图:
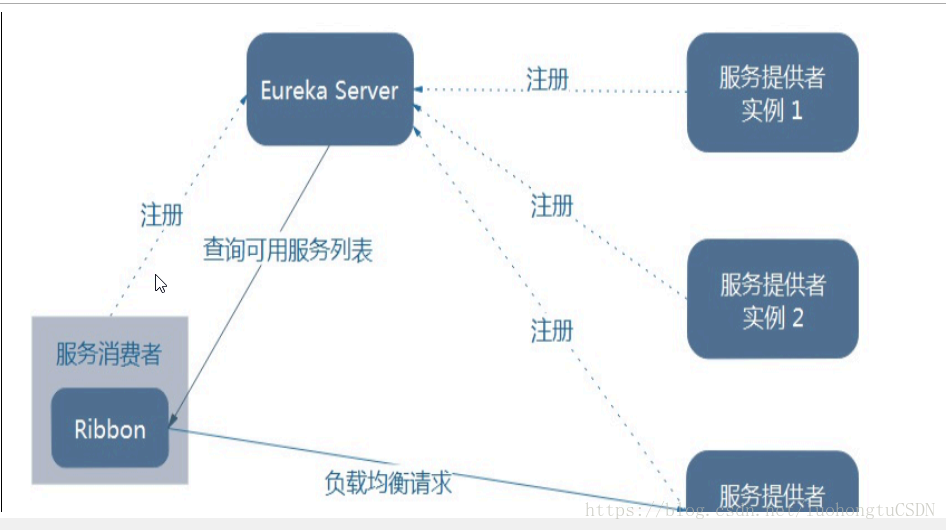
实现方法
目标:构建provider集群后consumer通过负载均衡轮询调用在Eureka中注册的服务
- 构建集群,新开两个provider模块,将原provider的代码部分和pom.xml中依赖照搬到新的provider中
- 将原provider中application.yml文件照搬到新provider,并修改端口号,若新的provider使用自己的数据库,则修改数据库信息(其他配置也一样,如修改别名)
- 集群中服务名称必须一致!!!
spring:
  application:
    name: microservicecloud-dept   #同一集群下必须使用同一服务名!!!!!
- 启动服务,进行测试
总结
Ribbon其实就是一个软负载均衡的客户端组件,可以和其他需要请求的客户端结合使用。
Ribbon核心组件IRule
IRule:根据特定算法从服务列表中选取一个需要访问的服务
七大方法
IRule是一个接口,七大方法是其自带的落地实现类
- RoundRobinRule:轮询(默认方法)
- RandomRule:随机
- AvailabilityFilteringRule:先过滤掉由于多次访问故障而处于断路器跳闸状态的服务,还有并发的连接数量超过阈值的服务,然后对剩余的服务进行轮询
- WeightedResponseTimeRule:根据平均响应时间计算服务的权重。统计信息不足时会按照轮询,统计信息足够会按照响应的时间选择服务
- RetryRule:正常时按照轮询选择服务,若过程中有服务出现故障,在轮询一定次数后依然故障,则会跳过故障的服务继续轮询。
- BestAvailableRule:先过滤掉由于多次访问故障而处于断路器跳闸状态的服务,然后选择一个并发量最小的服务
- ZoneAvoidanceRule:默认规则,符合判断server所在的区域的性能和server的可用性选择服务
切换规则方法
只需在配置类中配置一个返回具体方法的bean即可
@Bean
public IRule MyRule(){

        return new RandomRule();
    }
自定义Ribbon负载均衡算法
配置及包位置
- 自定义的Ribbon算法类不能放在主启动类所在的包及子报下(确切来说是不能放在@ComponentScan注解的包及子包下),否则会被全局应用到Ribbon服务中。应该把自定义算法类放在另外新建的包下,且这个类应该是为配置类。(其实与普通切换负载均衡规则类似,只不过是位置不同而已,普通的可以放在主启动类所在的包,自定义的要放在外面的包下)
- 主启动类添加@RibbonClient(name = “微服务名”,configuration = XXX.class)注解指定需要用到负载均衡的微服务名及自定义算法的class对象。
@SpringBootApplication
@EnableEurekaClient
@RibbonClient(name = "MICROSERVICECLOUD-DEPT",configuration = MyRule.class)
public class Consumer80_APP {

    public static void main(String[] args) {

        SpringApplication.run(Consumer80_APP.class,args);
    }
}
####通过修改源代码获得自定义算法
目标:每个服务调用5次后再进行轮询(调用次数不是很对,懒得改了)
package com.Rules;

import com.netflix.client.config.IClientConfig;
import com.netflix.loadbalancer.AbstractLoadBalancerRule;
import com.netflix.loadbalancer.ILoadBalancer;
import com.netflix.loadbalancer.RoundRobinRule;
import com.netflix.loadbalancer.Server;
import org.slf4j.Logger;
import org.slf4j.LoggerFactory;
import org.springframework.context.annotation.Configuration;

import java.util.List;
import java.util.concurrent.atomic.AtomicInteger;


public class MyRule extends AbstractLoadBalancerRule {


    private AtomicInteger nextServerCyclicCounter;
    private static final boolean AVAILABLE_ONLY_SERVERS = true;
    private static final boolean ALL_SERVERS = false;
    private int total = 0;
    private int currentIndex = 0;

    private static Logger log = LoggerFactory.getLogger(RoundRobinRule.class);

    public MyRule() {

        nextServerCyclicCounter = new AtomicInteger(0);
    }

    public MyRule(ILoadBalancer lb) {

        this();
        setLoadBalancer(lb);
    }

    public Server choose(ILoadBalancer lb, Object key) {

        if (lb == null) {

            log.warn("no load balancer");
            return null;
        }

        Server server = null;
        int count = 0;
        while (server == null && count++ < 10) {

            List<Server> reachableServers = lb.getReachableServers();
            List<Server> allServers = lb.getAllServers();
            int upCount = reachableServers.size();
            int serverCount = allServers.size();

            if ((upCount == 0) || (serverCount == 0)) {

                log.warn("No up servers available from load balancer: " + lb);
                return null;
            }
            if (total > 5) {

                total = 0;
                int nextServerIndex = incrementAndGetModulo(serverCount);
                currentIndex = nextServerIndex;
                server = allServers.get(nextServerIndex);
            }else {

                if (currentIndex>=serverCount) {

                    currentIndex = 0;
                }
                server = allServers.get(currentIndex);
                total++;
            }


            if (server == null) {

                /* Transient. */
                Thread.yield();
                continue;
            }

            if (server.isAlive() && (server.isReadyToServe())) {

                return (server);
            }

            // Next.
            server = null;
        }

        if (count >= 10) {

            log.warn("No available alive servers after 10 tries from load balancer: "
                    + lb);
        }
        return server;
    }

    /**
     * Inspired by the implementation of {@link AtomicInteger#incrementAndGet()}.
     *
     * @param modulo The modulo to bound the value of the counter.
     * @return The next value.
     */
    private int incrementAndGetModulo(int modulo) {

        for (;;) {

            int current = nextServerCyclicCounter.get();
            int next = (current + 1) % modulo;
            if (nextServerCyclicCounter.compareAndSet(current, next))
                return next;
        }
    }


    public Server choose(Object key) {

        return choose(getLoadBalancer(), key);
    }


    public void initWithNiwsConfig(IClientConfig clientConfig) {

    }
}
Feign负载均衡
Feign是一个声明式WebService客户端,使用方法时定义一个接口并在上面添加注解即可。Feign支持可拔插式的编码器和解码器。Spring Cloud对Feign进行了封装,使其支持SpringMVC和HttpMessageConverters。Feign可以与Eureka和Ribbon组合使用以支持负载均衡。
使用案例
- 新建Feign模块,加入依赖(其实跟80消费者差不多,主要是多了Feign依赖)
    <dependencies>
        <dependency>
            <groupId>com.XXX</groupId>
            <artifactId>microservice-api</artifactId>
            <version>${project.version}</version>
        </dependency>
        <dependency>
            <groupId>org.springframework.boot</groupId>
            <artifactId>spring-boot-starter-web</artifactId>
        </dependency>
        <dependency>
            <groupId>org.springframework.cloud</groupId>
            <artifactId>spring-cloud-starter-feign</artifactId>
        </dependency>
        <dependency>
            <groupId>org.springframework.cloud</groupId>
            <artifactId>spring-cloud-starter-eureka</artifactId>
        </dependency>
        <dependency>
            <groupId>org.springframework.cloud</groupId>
            <artifactId>spring-cloud-starter-ribbon</artifactId>
        </dependency>
        <dependency>
            <groupId>org.springframework.cloud</groupId>
            <artifactId>spring-cloud-starter-config</artifactId>
        </dependency>
        <!--热部署-->
        <dependency>
            <groupId>org.springframework</groupId>
            <artifactId>springloaded</artifactId>
        </dependency>
        <dependency>
            <groupId>org.springframework.boot</groupId>
            <artifactId>spring-boot-devtools</artifactId>
        </dependency>
    </dependencies>
- 因为Feign开发其实是面向接口编程,所以Feign接口可以放在api模块中供各模块使用,所以要在api模块中添加Feign依赖
- 在api中编写接口,接口上添加@FeignClient注解,并通过value指定作用的微服务名
@FeignClient(value = "MICROSERVICECLOUD-DEPT")
public interface DeptClientService {


    @PostMapping("/dept")
    public boolean addDept(Dept dept);

    @GetMapping("/dept")
    public List<Dept> findAll();

    @GetMapping("/dept/{id}")
    public Dept findById(@PathVariable("id")Integer id);
}
- 在Feign模块中编写Controller,并注入FeignClient接口,直接调用service接口中的方法即可(因为声明Feign接口时已经指定过微服务,所以访问时会正确地找到微服务)
@RestController
@RequestMapping("/consumer")
public class ConsumerDeptController {

    @Autowired
    private DeptClientService service;

    @PostMapping("/dept")
    public boolean addDept(Dept dept){

        return service.addDept(dept);
    }

    @GetMapping("/dept")
    public List<Dept> findAll(){

        return service.findAll();
    }

    @GetMapping("/dept/{id}")
    public Dept findById(@PathVariable("id")Integer id){

        return service.findById(id);
    }
}
- 修改Feign模块的主启动类,加入@EnableFeignClients注解和@ComponentScan注解(主要是扫描api中声明的接口)
@SpringBootApplication
@EnableEurekaClient
@EnableFeignClients(basePackages = {
    "com.XXX"})
@ComponentScan("com.XXX")
public class Consumer80Feign_APP {

    public static void main(String[] args) {

        SpringApplication.run(Consumer80Feign_APP.class,args);
    }
}
- 启动后访问,即会按照轮询的方式调用provider集群
总结
- Feign通过接口方法调用REST服务,在Eureka中查找对应的服务
- Feign集成了Ribbon技术,所以也支持负载均衡(轮询)
Hystrix断路器
分布式系统面临的问题
扇出
多个微服务互相调用的时候,如果A调用B、C,而B、C又继续调用其他微服务,这就是扇出(像一把扇子一样慢慢打开。
服务雪崩
- 删除过程中,如果某一个环节的服务出现故障或连接超时,就会导致前面的服务占用越来越多的资源,进而引起系统崩溃,就是“雪崩效应”。
- 对于高流量的应用来说,单一的后端依赖会导致服务器所有的资源都在几秒钟内饱和。比失败更糟糕的是,这些应用程序还可能导致服务之间的延迟增加,备份队列,线程和其他系统资源紧张,导致整个系统发生更多的级联故障。这些都表示需要对故障和延迟进行隔离和管理,以便单个依赖关系的失败,不能取消整个应用程序或系统。
Hystrix介绍
- Hystrix是一个用于处理分布式系统延迟和容错的开源库。分布式系统中,依赖避免不了调用失败,比如超时,异常等。Hystrix能保证在出现问题的时候,不会导致整体服务失败,避免级联故障,以提高分布式系统的弹性。
- Hystrix类似一个“断路器”,当系统中异常发生时,断路器给调用返回一个符合预期的,可处理的FallBack,这样就可以避免长时间无响应或抛出异常,使故障不能再系统中蔓延,造成雪崩。
服务熔断
- 熔断机制的注解是@HystrixCommand
- 熔断机制是应对雪崩效应的一种链路保护机制,一般存在于服务端
- 当扇出链路的某个服务出现故障或响应超时,会进行服务降级,进而熔断该节点的服务调用,快速返回“错误”的相应信息。、
- Hystrix的熔断存在阈值,缺省是5秒内20次调用失败就会触发
熔断案例
- 构建一个新的provider module(如复制8001module)
- pom.xml加入hystrix依赖(一定要配合Eureka)
        <dependency>
            <groupId>org.springframework.cloud</groupId>
            <artifactId>spring-cloud-starter-hystrix</artifactId>
        </dependency>
- application.xml中配置端口和Eureka信息(必配)和其他框架的配置信息(可选,如mybatis)
- 编写具体业务逻辑
- controller类中,在需要配置Fallback的方法上加入@@HystrixCommand(fallbackMethod = “XXX”)注解,XXX为FallBack方法名本例中作为测试所以抛出了异常
    @ResponseBody
    @GetMapping("/dept/{id}")
    @HystrixCommand(fallbackMethod = "nullDeptFallBack")
    public Dept findById(@PathVariable("id")Integer id) {

        Dept dept = deptService.findById(id);
        if (null == dept){

            throw new RuntimeException("返回值为空!");
        }
        return dept;
    }
- 根据需要配置FallBack的方法返回值编写代码
 public Dept nullDeptFallBack(@PathVariable("id")Integer id) {

        System.out.println(111);
        return new Dept().setId(id).setDeptName("nullName").setDbSource("nullDB");
    }
- 主启动类中加入@EnableCircuitBreaker注解
- 开启服务,测试
解耦与降级处理
降级
- 当系统整体资源快不够的时候,忍痛将部分服务暂时关闭,带渡过难关后,再重新开启。
- 降级处理时在客户端完成的,与服务端没有关系
- 理解:所谓降级,一般是从整体负荷考虑,当某个服务熔断之后,服务器将不再被调用,此时客户端可以自己准备一个本地的FallBack回调,返回一个缺省值。这样做虽然服务水平下降,但好歹可用,比直接挂掉好。
为什么要解耦
如果按照上面的熔断案例来做的话,Controller下的每个方法,都要给其编写一个FallBack方法,当方法慢慢变多,就会造成代码膨胀,一个是增加编写的工作量,另外一个也会增大维护的难度,代码的耦合度也会高,是十分不合理的,所以要将其解耦。
解耦思路
因为服务端的是通过实现接口访问服务端的,如果在父接口上实现了FallBack方法,通过这样一种方式去维护起来就能实现解耦,也顺便完成了降级的机制。
解耦&降级案例
- 在api模块中新建实现了FallbackFactory接口的类,其中泛型T就是我们需要维护其FallBack的接口方法,并实现其create方法,在create方法中返回实现了T的对象,使用匿名内部类实现T。注意:这个类一定要加@Component注解!!这个类一定要加@Component注解!!这个类一定要加@Component注解!!
import com.XXX.entity.Dept;
import feign.hystrix.FallbackFactory;
import org.springframework.stereotype.Component;

import java.util.List;

@Component
public class DeptClientServiceFallBackFactory implements FallbackFactory<DeptClientService> {

    public DeptClientService create(Throwable throwable) {

        return new DeptClientService() {

            public boolean addDept(Dept dept) {

                return false;
            }

            public List<Dept> findAll() {

                return null;
            }

            public Dept findById(Integer id) {

                return new Dept().setId(id).setDeptName("服务器跪了,").setDbSource("迟点来吧");
            }
        };
    }
}
- 修改步骤1中传入的泛型T接口,添加@FeignClient(fallbackFactory = T.class)注解
@FeignClient(value = "MICROSERVICECLOUD-DEPT",fallbackFactory = DeptClientServiceFallBackFactory.class)
public interface DeptClientService {


    @PostMapping("/dept")
    public boolean addDept(Dept dept);

    @GetMapping("/dept")
    public List<Dept> findAll();

    @GetMapping("/dept/{id}")
    public Dept findById(@PathVariable("id")Integer id);
}
- 修改consumer feign模块的application.xml文件,开启hystrix(注:在IDEA中可能没有代码提示,开启的true也没有正常高亮,但好像不需要做额外操作也不影响结果)
feign:
  hystrix:
    enabled: true
- 开启服务并测试
HystrixDashboard服务监控
介绍:SpringCloud对Hystrix Dashboard进行了整合,可以对通过Hystrix发起的请求进行准实时统计,并以报表和图形的形式展示给用户(包括每秒执行多少次请求成功和失败等)。
配置案例
- 新建HystrixDashboard模块,pom.xml文件加入HystrixDashboard依赖,其他依赖包括Feign,Ribbon,Eureka(可参考80模块的依赖)
        <dependency>
            <groupId>org.springframework.cloud</groupId>
            <artifactId>spring-cloud-starter-hystrix-dashboard</artifactId>
        </dependency>
- application.yml文件中配置端口(如9001)
- provider类中确认要加入actuator依赖(此为监控依赖)
        <dependency>
            <groupId>org.springframework.boot</groupId>
            <artifactId>spring-boot-starter-actuator</artifactId>
        </dependency>
- 编写主启动类,上标@EnableHystrixDashboard标注
@SpringBootApplication
@EnableHystrixDashboard
public class DashBoard9001_APP {

    public static void main(String[] args) {

        SpringApplication.run(DashBoard9001_APP.class,args);
    }
}
- 启动服务进行测试,访问地址:http://localhost:9001/hystrix,(根据配置端口号),看到刺猬表示已经配置好了
如何监控
- 在dashboard界面中,填入需要监控的服务地址和端口号加上\hystrix.stream和监测间隔即可进入监控。(如http://localhost:8001/hystrix.stream
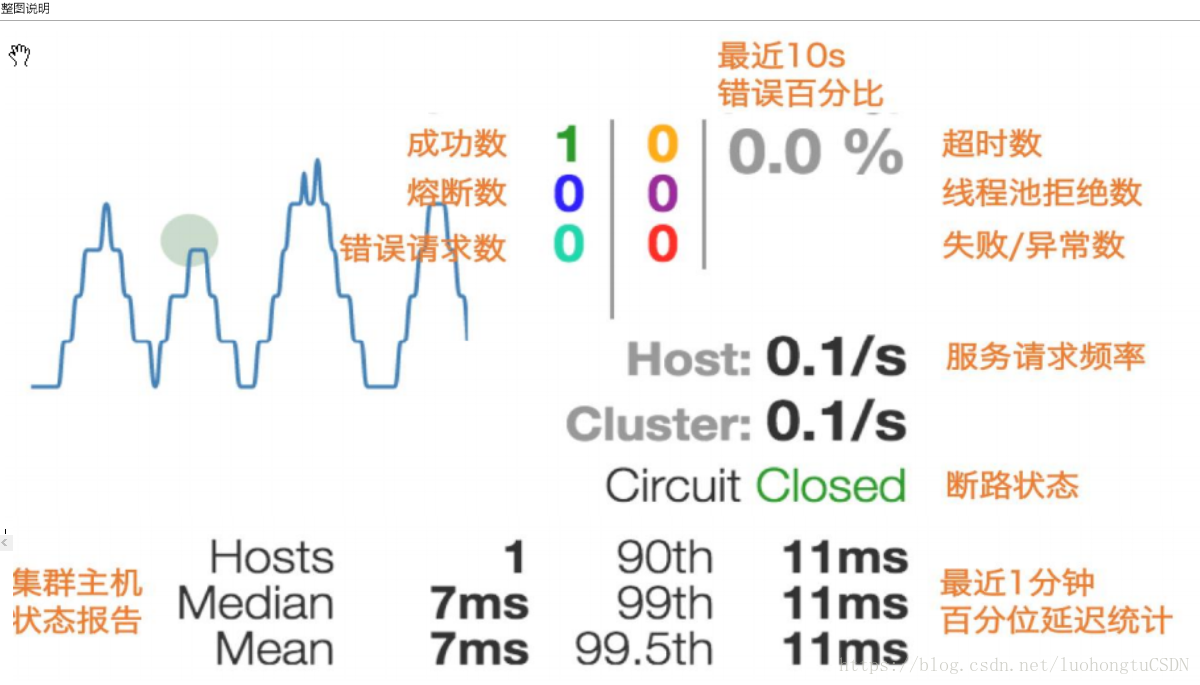
监控分析
- 七色:进入监控界面后会有其中颜色的数字,其含义可以对应右上角相同颜色的单词表示的状态,其值代表该状态下触发的次数
- 一圈:圈的大小代表该服务的流量,圈越大流量越大
- 一线:代表监控间隔中,服务被访问的频率的折线图
- 通过观察这些就可以在大量的实例中找出故障实例和高压实例进行修复和维护。
Zuul路由网关
概述
-
代理:Zuul提供外部的请求转发到具体的微服务实例中的服务
-
路由:Zuul可以对外部访问实现统一的入口
-
过滤:Zuul可以对外部访问进行干预,如请求校验、服务聚合等
-
Zuul需要配合Eureka使用,需要在Eureka中注册并获得其他微服务的信息
-
理解:Zuul就像大楼的保安,可以请他找人(代理),找的人在外面叫什么名字(路由),准不准你进楼(过滤)。因为保安属于物业公司,所以保安要在物业公司注册,所获得的信息也来源于物业公司(与Eureka的关系)。
基本配置
- 构建新的Zuul模块并在pom.xml中加入依赖(Zuul和Eureka必须同时加入)
<!-- 注意这里必须引入 eureka zuul 是有eureka发现服务的,如果这个包,
则会报服务不存在-->
<dependency>
            <groupId>org.springframework.cloud</groupId>
            <artifactId>spring-cloud-starter-eureka</artifactId>
</dependency>
<dependency>
       <groupId>org.springframework.cloud</groupId>
       <artifactId>spring-cloud-starter-zuul</artifactId>
</dependency>
- 新建application.yml文件并配置(一定要向Eureka注册,因为Zuul本身也是一个微服务)
server:
  port: 9527

spring:
  application:
    name: microservicecloud-zuul   #为这个服务取名,非常重要!!!!!

eureka:
  client:
    service-url:
      defaultZone: http://eureka7001.com:7001/eureka/,http://eureka7002.com:7002/eureka/,http://eureka7003.com:7003/eureka/
  instance:
    instance-id: zuul.com
    prefer-ip-address: true
- 修改hosts文件(非必须,不过能更好看出效果)
127.0.0.0 zuul.com
- 创建主启动类,并加入@EnableZuulProxy注解
@SpringBootApplication
@EnableZuulProxy
public class Zuul9527_APP {


    public static void main(String[] args) {

        SpringApplication.run(Zuul9527_APP.class,args);
    }
}
-
启动测试,访问规则:步骤3中指定映射+端口号+微服务名称+访问路径。
路由访问映射规则
服务名映射和统一公共前缀
当不向暴露真实的服务名时,可以对服务名进行映射,只需在application.yml中配置即可,具体作用看注释
zuul:
  routes:
  	#dept0是可以自定义的只是作为区分,没什么具体意义
    dept0.serviceId: microservicecloud-dept
    #路径也是自定义的,支持通配符
    dept0.path: /dept10/**
  #需要隐藏的服务名,可以使用通配符,配置之后通过这个微服务名访问就失效了
  ignored-services: microservicecloud-*
  #设置统一公共前缀,设置后访问路径:http://zuul.com:9527/nihao/dept10/dept/3
  prefix: /nihao
注:因为Zuul是针对外部访问管理的,所以配置了隐藏的服务,在系统中其他模块进行服务名访问时依然可以正常运行的,这点可以通过打开consumer模块进行验证!
SpringCloud Config 分布式配置中心
分布式系统面临的配置问题:微服务意味着将单体应用拆分成一个个自服务,这些服务都是要相应的配置信息才能运行,随着系统内微服务数量越来越多,配置信息也不断地增多,所以一套集中式的、动态的配置管理设施是必不可少的。
概述
- SpringCloud Config是一个提供外部集中式配置管理的设施,配置服务器为各种不同的额微服务应用提供了一个中心化的外部配置
- SpringCloud Config分为客户端和服务端两部分
- 服务端:分布式配置中心,是一个独立的微服务,用来连接并为客户端提供配置信息,加密/解密信息等访问接口
- 客户端:通过指定的配置中心获取配置资源,cloud推荐用git来存储配置信息
- SpringCloud Config解决的问题:
- 集中管理配置文件
- 不同环境不同配置,动态化的配置更新
- 运行期间动态调整配置,不再需要在每个服务部署的机器上编写配置文件,让服务中心统一为服务拉取配置文件
- 当配置发生变动时,服务不需要重启即可感知配置变化并应用
- 将配置信息以REST接口形式暴露

SpringCloud Config服务端与Github通讯
目标:将配置文件部署在github,Config服务端从github获取配置
案例
- 新建ConfigServer模块并配置pom.xml
		<!-- springCloud Config -->
		<dependency>
			<groupId>org.springframework.cloud</groupId>
			<artifactId>spring-cloud-config-server</artifactId>
		</dependency>
		<!-- 避免Config的Git插件报错:org/eclipse/jgit/api/TransportConfigCallback -->
		<dependency>
			<groupId>org.eclipse.jgit</groupId>
			<artifactId>org.eclipse.jgit</artifactId>
			<version>4.10.0.201712302008-r</version>
		</dependency>
- 建立远程仓库,并上传配置文件。如下例
spring:
    profiles:
        active:
           - dev
---
spring:
    profiles: dev
    application:
        name: microservicecloud-config-XXX-dev
---
spring:
    profiles: test
    application:
        name: microservicecloud-config-XXX-test
- 在application.xml(configServer端默认从git上面获取application.yml文件)文件中配置github地址
server:
  port: 3344

spring:
  application:
    #为这个服务取名,非常重要!!!!!
    name: microservicecloud-config
  cloud:
    config:
      server:
        git:
          # uri填github上仓库地址
          uri: https://github.com/XXXX/SpringCloud_Configuration.git
- 编写主启动类,加入@EnableConfigServer注解
@SpringBootApplication
@EnableConfigServer
public class ConfigServer3344_APP {

    public static void main(String[] args) {

        SpringApplication.run(ConfigServer3344_APP.class,args);
    }
}
- 启动服务并尝试访问配置文件,有以下五种访问配置规则
- {application}:配置文件的文件名
- {profile}:读取的环境
- {lable}:分支
/{application}/{profile}[/{lable}]
/{application}-{profile}.yml
/{lable}/{application}-{profile}.yml
/{application}-{profile}.properties
/{lable}/{application}-{profile}.properties
可用例子(返回格式可能不大相同,但返回值相同):
- http://config3344.com:3344/application-test.yml
- http://config3344.com:3344/master/application-dev.yml
- http://config3344.com:3344/application-test.yml/master
不可用例子:
- 没有该环境,返回空值:http://config3344.com:3344/application-test11.yml/master
- 没有配置文件,犯回错误页面:http://config3344.com:3344/lkjliiusdfsddsfl.yml
bootstrap.yml介绍
- bootstrap.yml比application.yml具有更高的优先级。
- bootstrap.yml是系统级的资源配置项,application.yml是用户级的资源配置项。
- SpringCloud会创建"BootStrap Context"作为"ApplicationContext"的父上下文。初始化的时候BootStrap Context负责从外部源加载配置属性并解析。这两个上下文共享一个"Environment",BootStrap 具有更高优先级,他们不会被本地配置覆盖。
客户端的配置与测试
介绍:客户端主要是在加载时通过config server服务端获得github配置仓库的地址,进而通过目标配置文件的文件名获取相应的配置,最后将取得的配置对自身资源进行赋值并提供访问
实现过程
1.创建远程配置yml文件并上传到github上。如下测试案例因为需要进行测试,所以配置了两个profiles方便切换并观察
spring:
    profiles:
        active:
           - dev
---
server:
    port: 8201
spring:
    profiles: dev
    application:
        name: microservicecloud-config-client-dev
eureka:
    client:
        service-url:
            defaultZone: http://eureka-dev.com:7001/eureka/
---
server:
    port: 8202
spring:
    profiles: test
    application:
        name: microservicecloud-config-client-test
eureka:
    client:
        service-url:
            defaultZone: http://eureka-dev.com:7001/eureka/
- 本地创建config client模块,并配置好pom.xml,以下本组件是必选依赖
        <dependency>
            <groupId>org.springframework.cloud</groupId>
            <artifactId>spring-cloud-starter-config</artifactId>
        </dependency>
- 编写bootstrap.yml配置文件,这个步骤比较关键,主要是根据此处的配置信息去寻找config server以获得github仓库地址和配置中的目标配置文件文件名(git上面文件名,要和config.name值相同,否则匹配不到,默认用application.yml)
spring:
  cloud:
    config:
      name: application_config #需要从github上读取的资源名称,注意没有yml后缀名
      profile: test   #本次访问的配置项
      label: master
      uri: http://config3344.com:3344  #本微服务启动后先去找3344号服务,通过SpringCloudConfig获取GitHub的服务地址
- application.yml文件在本module中其实是可写可不写的,为了习惯需要,还是给他写了个名字
spring:
  application:
    name: microservicecloud_config
-
修改host文件增加映射,和3344一样
-
编写主启动类,没什么特别的,最基本的主启动类
@SpringBootApplication public class ConfigClientApplication { public static void main(String[] args){ SpringApplication.run(ConfigClientApplication.class,args); } } -
编写controller,此步骤也比较关键,主要是利用@Value注解赋值,若写错了bootstrap.yml中的配置文件名称而没有获取到配置,启动时这里会抛出异常。@Value中注解的参数即是目标配置文件中的参数值,使用El表达式获取
@org.springframework.web.bind.annotation.RestController
public class RestController {

    @Value("${server.port}")
    private String port;
    @Value("${eureka.client.service-url.defaultZone}")
    private String eurekaZone;
    @Value("${spring.application.name}")
    private String name;


    @GetMapping("/config")
    @Override
    public String toString() {

        return "RestController{" +
                "port='" + port + '\'' +
                ", eurekaZone='" + eurekaZone + '\'' +
                ", name='" + name + '\'' +
                '}';
    }
}
- 先启动config server服务,然后再启用本client服务,根据profiles的值访问对应的端口即可。如本例选择的是test,则访问端口为:http://config3355.com:8202/config。(config3355.com为hosts文件中配置了的映射)
SpringCloud的配置实战
介绍:其实前面client的配置案例都是帮助理解这个组件为主,并没有很大的实际意义。。。。。。这节的案例中是配置一个Provider,一个eureka,他们的配置统一在github上获取,实现统一配置分布式管理和多环境变更,这个才比较有实战意义。
实现过程
- 先写好provider和Eureka的配置yml文件,这两个文件和平常配置没什么不同,因为这里主要是说config,所以就没有配置集群,上传yml到github
Eureka配置文件示例:
spring:
    profiles:
        active:
           - dev
---
spring:
    profiles: dev
    application:
        name: microservicecloud-eureka-client-dev
server:
  port: 7001
eureka:
  instance:
    hostname: eureka7001.com    #hostname为hosts文件中映射的地址
  client:
    register-with-eureka: false     #false表示不向注册中心注册自己
    fetch-registry: false           #false表示自己就是注册中心,职责是维护实例,不参加检索
    service-url:
      defaultZone: http://eureka7001.com:7001/eureka/   #设置eureka server的交互地址

---
spring:
    profiles: test
    application:
        name: microservicecloud-eureka-client-dev
server:
  port: 7001
eureka:
  instance:
    hostname: eureka7001.com    #hostname为hosts文件中映射的地址
  client:
    register-with-eureka: false     #false表示不向注册中心注册自己
    fetch-registry: false           #false表示自己就是注册中心,职责是维护实例,不参加检索
    service-url:
      defaultZone: http://eureka7001.com:7001/eureka/    #设置eureka server的交互地址
Provider配置文件示例:
spring:
    profiles:
        active:
           - dev
---
server:
  port: 8001

mybatis:
  config-location: classpath:mybatis/mybatis.cfg.xml
  type-aliases-package: com.XXX.entity
  mapper-locations:
  - classpath:mybatis/mapper/**/*.xml
spring:
  profiles: dev
  application:
    name: microservicecloud-dept   #为这个服务取名,非常重要!!!!!
  datasource:
    type: com.alibaba.druid.pool.DruidDataSource
    driver-class-name: org.gjt.mm.mysql.Driver
    url: jdbc:mysql://192.168.88.246:3306/cloudDB01
    username: root
    password: 123456
    dbcp2:
      min-idle: 5         #最小连接数
      initial-size: 5    #初始化连接数
      max-total: 10      #最大连接数
      max-wait-millis: 200  #等待连接最长的超时时间
eureka:
  client:
    service-url:
      defaultZone: http://eureka7001.com:7001/eureka/
  instance:
    instance-id: dept8001
    prefer-ip-address: true
---
server:
  port: 8001

mybatis:
  config-location: classpath:mybatis/mybatis.cfg.xml
  type-aliases-package: com.XXX.entity
  mapper-locations:
  - classpath:mybatis/mapper/**/*.xml
spring:
  profiles: test
  application:
    name: microservicecloud-dept   #为这个服务取名,非常重要!!!!!
  datasource:
    type: com.alibaba.druid.pool.DruidDataSource
    driver-class-name: org.gjt.mm.mysql.Driver
    url: jdbc:mysql://192.168.88.246:3306/cloudDB02
    username: root
    password: 123456
    dbcp2:
      min-idle: 5         #最小连接数
      initial-size: 5    #初始化连接数
      max-total: 10      #最大连接数
      max-wait-millis: 200  #等待连接最长的超时时间
eureka:
  client:
    service-url:
      defaultZone: http://eureka7001.com:7001/eureka/
  instance:
    instance-id: dept8001
    prefer-ip-address: true
- 新开eureka和provide的模块并在pom.xml中添加依赖,其他必要依赖和之前的案例一样,但是config的依赖一定要添加上
        <dependency>
            <groupId>org.springframework.cloud</groupId>
            <artifactId>spring-cloud-starter-config</artifactId>
        </dependency>
- 两个模块都要编写bootstrap.yml文件,和上面的案例一样
spring:
  cloud:
    config:
      name: application_config #需要从github上读取的资源名称,注意没有yml后缀名
      profile: test   #本次访问的配置项
      label: master
      uri: http://config3344.com:3344  #本微服务启动后先去找3344号服务,通过SpringCloudConfig获取GitHub的服务地址
- (可选)两个模块中编写application.yml文件,可以配置一下服务名
spring:
  application:
    name: microservicecloud_config
- 两个模块的主启动类,Eureka的正常加EurekaServer注解,Provider加EurekaClient注解,不详述
- 编写Provider模块的业务代码
- 启动测试,因为这两个模块都要通过3344ConfigServer为其在github上获取配置,所以要先启动3344模块,然后再一次启动eureka和provider模块,进行测试即可。
智能推荐
前端开发之vue-grid-layout的使用和实例-程序员宅基地
文章浏览阅读1.1w次,点赞7次,收藏34次。vue-grid-layout的使用、实例、遇到的问题和解决方案_vue-grid-layout
Power Apps-上传附件控件_powerapps点击按钮上传附件-程序员宅基地
文章浏览阅读218次。然后连接一个数据源,就会在下面自动产生一个添加附件的组件。把这个控件复制粘贴到页面里,就可以单独使用来上传了。插入一个“编辑”窗体。_powerapps点击按钮上传附件
C++ 面向对象(Object-Oriented)的特征 & 构造函数& 析构函数_"object(cnofd[\"ofdrender\"])十条"-程序员宅基地
文章浏览阅读264次。(1) Abstraction (抽象)(2) Polymorphism (多态)(3) Inheritance (继承)(4) Encapsulation (封装)_"object(cnofd[\"ofdrender\"])十条"
修改node_modules源码,并保存,使用patch-package打补丁,git提交代码后,所有人可以用到修改后的_修改 node_modules-程序员宅基地
文章浏览阅读133次。删除node_modules,重新npm install看是否成功。在 package.json 文件中的 scripts 中加入。修改你的第三方库的bug等。然后目录会多出一个目录文件。_修改 node_modules
【】kali--password:su的 Authentication failure问题,&sudo passwd root输入密码时Sorry, try again._password: su: authentication failure-程序员宅基地
文章浏览阅读883次。【代码】【】kali--password:su的 Authentication failure问题,&sudo passwd root输入密码时Sorry, try again._password: su: authentication failure
整理5个优秀的微信小程序开源项目_微信小程序开源模板-程序员宅基地
文章浏览阅读1w次,点赞13次,收藏97次。整理5个优秀的微信小程序开源项目。收集了微信小程序开发过程中会使用到的资料、问题以及第三方组件库。_微信小程序开源模板
随便推点
Centos7最简搭建NFS服务器_centos7 搭建nfs server-程序员宅基地
文章浏览阅读128次。Centos7最简搭建NFS服务器_centos7 搭建nfs server
Springboot整合Mybatis-Plus使用总结(mybatis 坑补充)_mybaitis-plus ruledataobjectattributemapper' and '-程序员宅基地
文章浏览阅读1.2k次,点赞2次,收藏3次。前言mybatis在持久层框架中还是比较火的,一般项目都是基于ssm。虽然mybatis可以直接在xml中通过SQL语句操作数据库,很是灵活。但正其操作都要通过SQL语句进行,就必须写大量的xml文件,很是麻烦。mybatis-plus就很好的解决了这个问题。..._mybaitis-plus ruledataobjectattributemapper' and 'com.picc.rule.management.d
EECE 1080C / Programming for ECESummer 2022 Laboratory 4: Global Functions Practice_eece1080c-程序员宅基地
文章浏览阅读325次。EECE 1080C / Programming for ECESummer 2022Laboratory 4: Global Functions PracticePlagiarism will not be tolerated:Topics covered:function creation and call statements (emphasis on global functions)Objective:To practice program development b_eece1080c
洛谷p4777 【模板】扩展中国剩余定理-程序员宅基地
文章浏览阅读53次。被同机房早就1年前就学过的东西我现在才学,wtcl。设要求的数为\(x\)。设当前处理到第\(k\)个同余式,设\(M = LCM ^ {k - 1} _ {i - 1}\) ,前\(k - 1\)个的通解就是\(x + i * M\)。那么其实第\(k\)个来说,其实就是求一个\(y\)使得\(x + y * M ≡ a_k(mod b_k)\)转化一下就是\(y * M ...
android 退出应用没有走ondestory方法,[Android基础论]为何Activity退出之后,系统没有调用onDestroy方法?...-程序员宅基地
文章浏览阅读1.3k次。首先,问题是如何出现的?晚上复查代码,发现一个activity没有调用自己的ondestroy方法我表示非常的费解,于是我检查了下代码。发现再finish代码之后接了如下代码finish();System.exit(0);//这就是罪魁祸首为什么这样写会出现问题System.exit(0);////看一下函数的原型public static void exit (int code)//Added ..._android 手动杀死app,activity不执行ondestroy
SylixOS快问快答_select函数 导致堆栈溢出 sylixos-程序员宅基地
文章浏览阅读894次。Q: SylixOS 版权是什么形式, 是否分为<开发版税>和<运行时版税>.A: SylixOS 是开源并免费的操作系统, 支持 BSD/GPL 协议(GPL 版本暂未确定). 没有任何的运行时版税. 您可以用她来做任何 您喜欢做的项目. 也可以修改 SylixOS 的源代码, 不需要支付任何费用. 当然笔者希望您可以将使用 SylixOS 开发的项目 (不需要开源)或对 SylixOS 源码的修改及时告知笔者.需要指出: SylixOS 本身仅是笔者用来提升自己水平而开发的_select函数 导致堆栈溢出 sylixos