C# 将多个图片合并成TIFF文件的两种方法-程序员宅基地
技术标签: navicat git svg nagios less
最近需要用到TIF格式的文件,研究了一段时间,终于有点结果了,
发现两种方式,第一种是使用BitMiracle.LibTiff.NET,直接在Nuget上安装即可
,第二种是使用RasterEdge.DocImageSDK,要从官网下载dll包
第一种免费,但是生成的tiff文件大小比原始图片大的多
第二种收费,但是有试用期一个月,效果很好,生成的tiff文件比原图小的多而且不失真。过期之后,只需要到官网下载最新dll,重新引用即可再来一个月试用。。。
先说第二种RasterEdge.DocImageSDK的使用方法:
官网地址:http://www.rasteredge.com/how-to/csharp-imaging/tiff-convert-bmp/
//过期后打开上面 这个网址,重新下载 dll包,重新引用即可 bin x64 4.0
新建一个cmd项目,测试代码如下:
class Program
    {
        private static byte[] CompressionImage(Stream fileStream, long quality)
        {
            using (System.Drawing.Image img = System.Drawing.Image.FromStream(fileStream))
            {
                using (Bitmap bitmap = new Bitmap(img))
                {
                    ImageCodecInfo CodecInfo = GetEncoder(img.RawFormat);
                    System.Drawing.Imaging.Encoder myEncoder = System.Drawing.Imaging.Encoder.Quality;
                    EncoderParameters myEncoderParameters = new EncoderParameters(1);
                    EncoderParameter myEncoderParameter = new EncoderParameter(myEncoder, quality);
                    myEncoderParameters.Param[0] = myEncoderParameter;
                    using (MemoryStream ms = new MemoryStream())
                    {
                        bitmap.Save(ms, CodecInfo, myEncoderParameters);
                        myEncoderParameters.Dispose();
                        myEncoderParameter.Dispose();
                        return ms.ToArray();
                    }
                }
            }
        }
        private static ImageCodecInfo GetEncoder(ImageFormat format)
        {
            ImageCodecInfo[] codecs = ImageCodecInfo.GetImageDecoders();
            foreach (ImageCodecInfo codec in codecs)
            {
                if (codec.FormatID == format.Guid)
                { return codec; }
            }
            return null;
        }
        static void Main(string[] args)
        {
            string[] imagePaths = System.IO.Directory.GetFiles(@"D:\images\","*.jpg");

            Bitmap[] bmps = new Bitmap[imagePaths.Count()];
            for (int i = 0; i < imagePaths.Length; i++)
            {
                var stream = new FileStream(imagePaths[i], FileMode.Open);
                var by = CompressionImage(stream, 100);
                stream.Close();


                Bitmap tmpBmp = new Bitmap(new MemoryStream(by));


                if (tmpBmp != null)
                    bmps[i] = tmpBmp;
            }
            ImageOutputOption option = new ImageOutputOption() { Color = ColorType.Color, Compression = ImageCompress.CCITT };
            TIFFDocument tifDoc = new TIFFDocument(bmps, option);
            if (tifDoc == null)
                throw new Exception("Fail to construct TIFF Document");
            tifDoc.Save(@"D:\images\test.tif");
        }

    }
下面说说第二种免费的方式:
新建一个TiffHelper帮助类:
using BitMiracle.LibTiff.Classic;
using System;
using System.Drawing;
using System.Drawing.Imaging;
using System.IO;
namespace JpgToTiff
{
    public class UserErrorHandler : TiffErrorHandler
    {
        public override void WarningHandler(Tiff tif, string method, string format, params object[] args)
        {
            //base.WarningHandler(tif, method, format, args);
        }
        public override void WarningHandlerExt(Tiff tif, object clientData, string method, string format, params object[] args)
        {
            //base.WarningHandlerExt(tif, clientData, method, format, args);
        }
    }
    public class TiffHelper
    {
        public static UserErrorHandler m_errorHandler = new UserErrorHandler();
        static TiffHelper()
        {
            Tiff.SetErrorHandler(m_errorHandler);
        }
        /// <summary>
        /// 合并jpg
        /// </summary>
        /// <param name="bmps">bitmap数组</param>
        /// <param name="tiffSavePath">保存路径</param>
        /// <param name="quality">图片质量,1-100</param>
        /// <returns></returns>
        public static bool Jpegs2Tiff(Bitmap[] bmps, string tiffSavePath, int quality = 15)
        {
            try
            {
                MemoryStream ms = new MemoryStream();
                using (Tiff tif = Tiff.ClientOpen(@"in-memory", "w", ms, new TiffStream()))
                {
                    foreach (var bmp in bmps)//
                    {
                        byte[] raster = GetImageRasterBytes(bmp, PixelFormat.Format24bppRgb);
                        tif.SetField(TiffTag.IMAGEWIDTH, bmp.Width);
                        tif.SetField(TiffTag.IMAGELENGTH, bmp.Height);
                        tif.SetField(TiffTag.COMPRESSION, Compression.JPEG);
                        tif.SetField(TiffTag.PHOTOMETRIC, Photometric.RGB);
                        tif.SetField(TiffTag.JPEGQUALITY, quality);
                        tif.SetField(TiffTag.ROWSPERSTRIP, bmp.Height);


                        tif.SetField(TiffTag.XRESOLUTION, 90);
                        tif.SetField(TiffTag.YRESOLUTION, 90);


                        tif.SetField(TiffTag.BITSPERSAMPLE, 8);
                        tif.SetField(TiffTag.SAMPLESPERPIXEL, 3);


                        tif.SetField(TiffTag.PLANARCONFIG, PlanarConfig.CONTIG);


                        int stride = raster.Length / bmp.Height;
                        ConvertSamples(raster, bmp.Width, bmp.Height);


                        for (int i = 0, offset = 0; i < bmp.Height; i++)
                        {
                            tif.WriteScanline(raster, offset, i, 0);
                            offset += stride;
                        }


                        tif.WriteDirectory();
                    }
                    System.IO.FileStream fs = new FileStream(tiffSavePath, FileMode.Create);

                    ms.Seek(0, SeekOrigin.Begin);
                    fs.Write(ms.ToArray(), 0, (int)ms.Length);
                    fs.Close();
                    return true;
                }
            }
            catch (Exception ex)
            {
                return false;
            }
        }
        private static byte[] GetImageRasterBytes(Bitmap bmp, PixelFormat format)
        {
            Rectangle rect = new Rectangle(0, 0, bmp.Width, bmp.Height);
            byte[] bits = null;
            try
            {
                BitmapData bmpdata = bmp.LockBits(rect, ImageLockMode.ReadWrite, format);
                bits = new byte[bmpdata.Stride * bmpdata.Height];
                System.Runtime.InteropServices.Marshal.Copy(bmpdata.Scan0, bits, 0, bits.Length);
                bmp.UnlockBits(bmpdata);
            }
            catch
            {
                return null;
            }
            return bits;
        }
        private static void ConvertSamples(byte[] data, int width, int height)
        {
            int stride = data.Length / height;
            const int samplesPerPixel = 3;


            for (int y = 0; y < height; y++)
            {
                int offset = stride * y;
                int strideEnd = offset + width * samplesPerPixel;


                for (int i = offset; i < strideEnd; i += samplesPerPixel)
                {
                    byte temp = data[i + 2];
                    data[i + 2] = data[i];
                    data[i] = temp;
                }
            }
        }
    }
}
下面是测试代码:
class Program
    {
        private static byte[] CompressionImage(Stream fileStream, long quality)
        {
            using (System.Drawing.Image img = System.Drawing.Image.FromStream(fileStream))
            {
                using (Bitmap bitmap = new Bitmap(img))
                {
                    ImageCodecInfo CodecInfo = GetEncoder(img.RawFormat);
                    System.Drawing.Imaging.Encoder myEncoder = System.Drawing.Imaging.Encoder.Quality;
                    EncoderParameters myEncoderParameters = new EncoderParameters(1);
                    EncoderParameter myEncoderParameter = new EncoderParameter(myEncoder, quality);
                    myEncoderParameters.Param[0] = myEncoderParameter;
                    using (MemoryStream ms = new MemoryStream())
                    {
                        bitmap.Save(ms, CodecInfo, myEncoderParameters);
                        myEncoderParameters.Dispose();
                        myEncoderParameter.Dispose();
                        return ms.ToArray();
                    }
                }
            }
        }
        private static ImageCodecInfo GetEncoder(ImageFormat format)
        {
            ImageCodecInfo[] codecs = ImageCodecInfo.GetImageDecoders();
            foreach (ImageCodecInfo codec in codecs)
            {
                if (codec.FormatID == format.Guid)
                { return codec; }
            }
            return null;
        }
        static void Main(string[] args)
        {
            string[] imagePaths = System.IO.Directory.GetFiles(@"D:\images\","*.jpg");

            Bitmap[] bmps = new Bitmap[imagePaths.Count()];
            for (int i = 0; i < imagePaths.Length; i++)
            {
                var stream = new FileStream(imagePaths[i], FileMode.Open);
                var by = CompressionImage(stream, 100);
                stream.Close();


                Bitmap tmpBmp = new Bitmap(new MemoryStream(by));


                if (tmpBmp != null)
                    bmps[i] = tmpBmp;
            }
            TiffHelper.Jpegs2Tiff(bmps, @"D:\images\test.tif", 100);
        }
    }
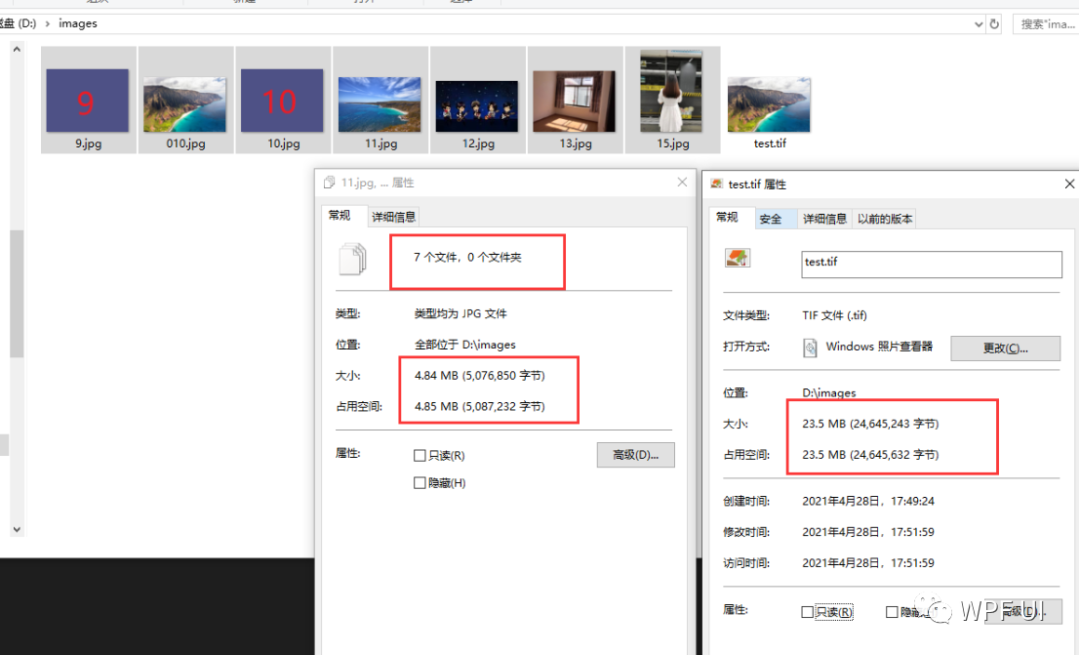
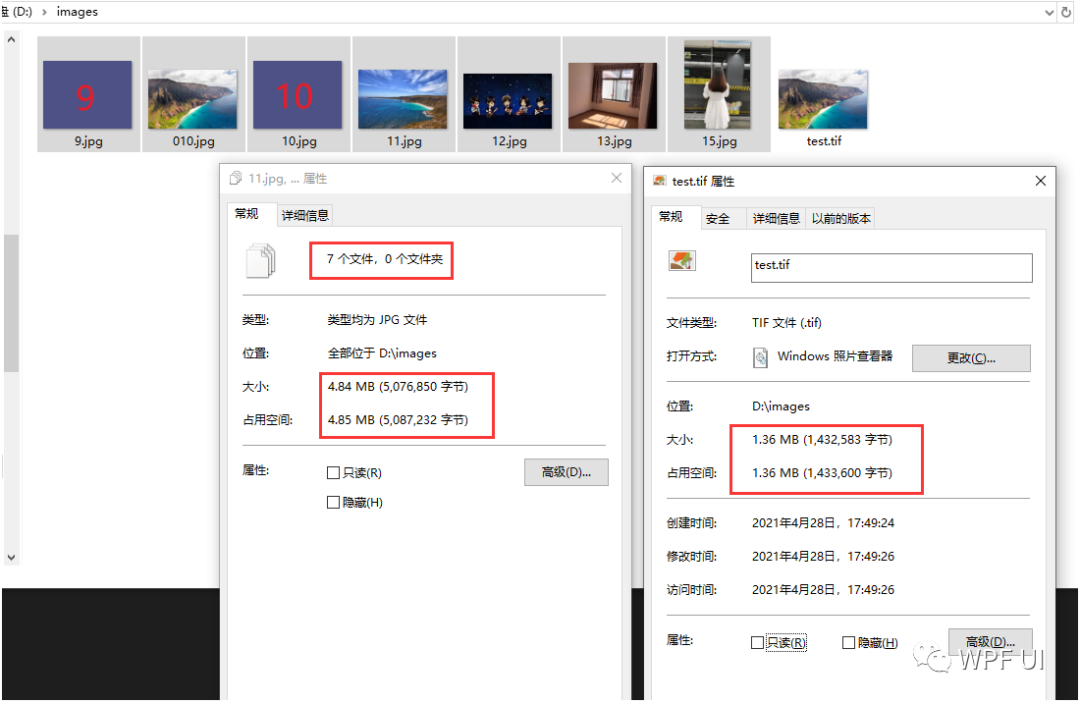
可以看到,两个方式生成的tif文件大小简直天壤之别。。。
7个原图大小4.8M,第一种1.36M,
第二种直接23.5M…
也可能是我没有弄好压缩方式。。。。
那我就不晓得了。
如果喜欢,点个赞呗


智能推荐
python中文显示不出来_解决Python词云库wordcloud不显示中文的问题-程序员宅基地
文章浏览阅读2.6k次。解决Python词云库wordcloud不显示中文的问题2018-11-25背景:wordcloud是基于Python开发的词云生成库,功能强大使用简单。github地址:https://github.com/amueller/word_cloudwordcloud默认是不支持显示中文的,中文会被显示成方框。安装:安装命令:pip install wordcloud解决:经过测试发现不支持显示中文..._词云python代码无法输出文字
JVM在线分析-解决问题的工具一(jinfo,jmap,jstack)_jmap 在线分析-程序员宅基地
文章浏览阅读807次。扩展。_jmap 在线分析
台式计算机cpu允许温度,玩游戏cpu温度多少正常(台式电脑夏季CPU一般温度多少)...-程序员宅基地
文章浏览阅读1.1w次。随着炎热夏季的到来,当玩游戏正爽的时候,电脑突然死机了,自动关机了,是不是有想给主机一脚的冲动呢?这个很大的原因是因为CPU温度过高导致的。很多新手玩家可能都有一个疑虑,cpu温度多少以下正常?有些说是60,有些说是70,到底多高CPU温度不会死机呢?首先我们先看看如何查看CPU的温度。下载鲁大师并安装,运行鲁大师软件,即可进入软件界面,并点击温度管理,即可看到电脑各个硬件的温度。鲁大师一般情况下..._台式机玩游戏温度多少正常
小白自学Python日记 Day2-打印打印打印!_puthon打印任务收获-程序员宅基地
文章浏览阅读243次。Day2-打印打印打印!我终于更新了!(哭腔)一、 最简单的打印最最简单的打印语句: print(“打印内容”)注意:python是全英的,符号记得是半角下面是我写的例子:然后进入power shell ,注意:你需要使用cd来进入你保存的例子的文件夹,保存时名字应该取为xxx.py我终于知道为什么文件夹取名都建议取英文了,因为进入的时候是真的很麻烦!如果你没有进入正确的文件夹..._puthon打印任务收获
Docker安装:Errors during downloading metadata for repository ‘appstream‘:_"cenerrors during download metadata for repository-程序员宅基地
文章浏览阅读1k次。centos8问题参考CentOS 8 EOL如何切换源? - 云服务器 ECS - 阿里云_"cenerrors during download metadata for repository \"appstream"
尚硅谷_谷粒学苑-微服务+全栈在线教育实战项目之旅_基于微服务的在线教育平台尚硅谷-程序员宅基地
文章浏览阅读2.7k次,点赞3次,收藏11次。SpringBoot+Maven+MabatisPlusmaven在新建springboot项目引入RELEASE版本出错maven在新建springboot项目引入RELEASE版本出错maven详解maven就是通过pom.xml中的配置,就能够从仓库获取到想要的jar包。仓库分为:本地仓库、第三方仓库(私服)、中央仓库springframework.boot:spring-boot-starter-parent:2.2.1.RELEASE’ not found若出现jar包下载不了只有两_基于微服务的在线教育平台尚硅谷
随便推点
网络学习第六天(路由器、VLAN)_路由和vlan-程序员宅基地
文章浏览阅读316次。路由的概念路由器它称之为网关设备。路由器就是用于连接不同网络的设备路由器是位于OSI模型的第三层。路由器通过路由决定数据的转发。网关的背景:当时每家计算机厂商,用于交换数据的通信程序(协议)和数据描述格式各不相同。因此,就把用于相互转换这些协议和格式的计算机称为网关。路由器与三层交换器的对比路由协议对比路由器的作用:1.路由寻址2.实现不同网络之间相连的功能3.通过路由决定数据的转发,转发策略称为 路由选择。VLAN相关技术什么是VLAN?中文名称叫:虚拟局域网。虚_路由和vlan
设置div背景颜色透明度,内部元素不透明_div设置透明度,里面的内容不透明-程序员宅基地
文章浏览阅读2.8w次,点赞6次,收藏22次。设置div背景颜色透明度,内部元素不透明:.demo{ background-color:rgba(255,255,255,0.15) } 错误方式:.demo{ background-color:#5CACEE;opacity:0.75;} 这样会导致div里面的元素内容和背景颜色一起变透明只针对谷歌浏览器的测试_div设置透明度,里面的内容不透明
Discuz!代码大全-程序员宅基地
文章浏览阅读563次。1.[ u]文字:在文字的位置可以任意加入您需要的字符,显示为下划线效果。2.[ align=center]文字:在文字的位置可以任意加入您需要的字符,center位置center表示居中,left表示居左,right表示居右。5.[ color=red]文字:输入您的颜色代码,在标签的中间插入文字可以实现文字颜色改变。6.[ SIZE=数字]文字:输入您的字体大小,在标签的中间插入文..._discuzcode 大全
iOS NSTimer定时器-程序员宅基地
文章浏览阅读2.6k次。iOS中定时器有三种,分别是NSTimer、CADisplayLink、dispatch_source,下面就分别对这三种计时器进行说明。一、NSTimerNSTimer这种定时器用的比较多,但是特别需要注意释放问题,如果处理不好很容易引起循环引用问题,造成内存泄漏。1.1 NSTimer的创建NSTimer有两种创建方法。方法一:这种方法虽然创建了NSTimer,但是定时器却没有起作用。这种方式创建的NSTimer,需要加入到NSRunLoop中,有NSRunLoop的驱动才会让定时器跑起来。_ios nstimer
Linux常用命令_ls-lmore-程序员宅基地
文章浏览阅读4.8k次,点赞17次,收藏51次。Linux的命令有几百个,对程序员来说,常用的并不多,考虑各位是初学者,先学习本章节前15个命令就可以了,其它的命令以后用到的时候再学习。1、开机 物理机服务器,按下电源开关,就像windows开机一样。 在VMware中点击“开启此虚拟机”。2、登录 启动完成后,输入用户名和密码,一般情况下,不要用root用户..._ls-lmore
MySQL基础命令_mysql -u user-程序员宅基地
文章浏览阅读4.1k次。1.登录MYSQL系统命令打开DOS命令框shengfen,以管理员的身份运行命令1:mysql -u usernae -p password命令2:mysql -u username -p password -h 需要连接的mysql主机名(localhost本地主机名)或是mysql的ip地址(默认为:127.0.0.1)-P 端口号(默认:3306端口)使用其中任意一个就OK,输入命令后DOS命令框得到mysql>就说明已经进入了mysql系统2. 查看mysql当中的._mysql -u user